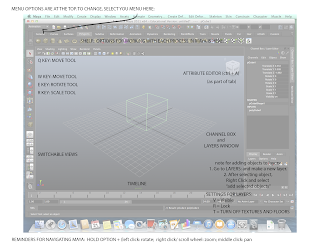
To Create a new Project: Go to File ---> Project Window.
- Click "NEW"
- Type a name for your project folder, select the destination (Documents, Maya, Projects)
- Hit Accept!
Basic Tools (things in red we are not using yet):
W- move
E- rotate
R- scale
G- repeat last command
q - exit tool
b- soft selection
shift + . - grow selection
alt + b - change background color
f - fit to selection/frame window
a - show all objects on screen
a - show all objects on screen
ctrl + a - open attribute editor/channel box
ctrl + delete - deletes an edge loop( 2014 version
and up only)
command + G - Group Objects Together!
command + G - Group Objects Together!
1 - standard mode
2 - subdivision mode with cage
3 - subdivision mode
4 - wireframe view
5 - shaded mode
6 - texture mode
The UV texture Editor helps an artist assign custom textures
to models! We can create a PSD network
that specializes in refined mapping of different types of surfaces and
materials onto a model!
Types of Modeling Tools:
Basic movement
tools (move scale and rotate)
Sculpt Geometry
Tool
Lattices
Advanced
Selection Tools (To Vertices, To Edges)
Convert >
Smooth Mesh Preview to Polygons
Subdivision
Modeling: Mesh > Smooth
The Channel Box gives us NODES to adjust
our models at every stage of production.
The Attribute
Editor lets us adjust shaders at every given stage of production.
The Layers Tab makes it easy for us to group objects!
The Layers Tab makes it easy for us to group objects!
- To use it go to Layer -> Create Empty Layer OR Layer -> Create Layer from Selected
Rendering a
scene is done within our RENDER SETTINGS for our animation!
No comments:
Post a Comment